")
Burmese biryani, or danbauk, really sits at the crossroads of Indian and Southeast Asian cooking. This Burmese chicken biryani blends fragrant basmati rice with tender marinated chicken, cashews, raisins, and caramelized onions to create a dish that’s milder and slightly sweeter than traditional Indian biryani.
I’ve always been fascinated by how Burmese cuisine takes familiar dishes and spins them into something truly its own. The ancient trade routes between India and the Far East brought Indian spices into Burma, and local cooks just ran with it. This danbauk is milder in heat and has those distinct Southeast Asian touches that make it stand out from other styles.
In this guide, I’ll walk you through the authentic ingredients and techniques you’ll need to make this comforting rice dish at home. You’ll see how to layer the rice and chicken, which spices really matter, and what sides go best with Burmese biryani. I hope you’ll find it as satisfying to make as it is to eat.

Key Ingredients for Authentic Burmese Biryani
Burmese biryani relies on fragrant spices, good rice, and well-marinated proteins for its unique flavor. The dish balances Indian spice traditions with Burmese cooking through caramelized onions, fresh herbs, and aromatic seasonings. Getting these elements right is where the magic happens.
Essential Spices and Aromatics
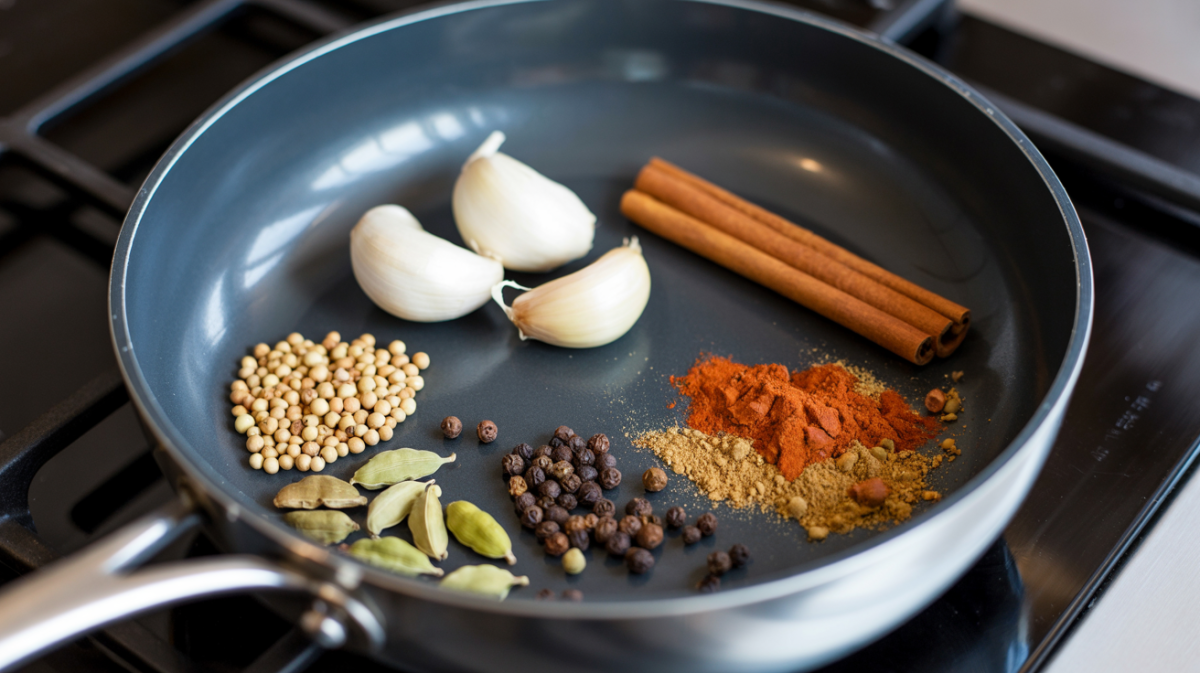
The spice blend is the backbone of authentic Burmese biryani. I toss in cardamom pods (both green and black), cinnamon sticks, cloves, and black peppercorns to infuse the rice with a bold aroma. It’s a heady mix, but not too much.
For ground spices, I go with biryani masala or garam masala, turmeric powder, cumin powder, and coriander powder. The chilli powder stays moderate, since Burmese biryani is milder than its Indian cousins. I like that you can taste the other flavors without being overwhelmed by heat.
Ginger paste and garlic paste are non-negotiable for the chicken marinade. I mix them with yogurt and spices to tenderize the meat. Green chilies bring a fresh kick, but they won’t overpower the Burmese biryani.
Cumin seeds and mustard seeds go into the oil first to let their flavors bloom. I slice onions thin and fry them until golden brown. These fried onions end up both in the dish and as a garnish.
Choice of Rice and Protein
Basmati rice is a must for proper Burmese biryani. I always use long-grain basmati because it stays fluffy and separate after cooking. The grains soak up the spices without turning mushy, which is key.
Marinated chicken is the classic protein for Burmese chicken biryani. I cut up a whole chicken or just use bone-in thighs and drumsticks. The bones add a depth of flavor you can’t get otherwise.
The marinade needs at least 30 minutes, but a couple of hours is way better. I make sure every piece gets coated in yogurt, ginger paste, garlic paste, and spices. Some folks add potatoes to Burmese biryani, and honestly, I think it’s a nice touch.
Special Flavorings and Garnishes
Saffron just takes Burmese biryani to another level. I soak a few threads in warm milk for that golden color and subtle floral note. Drizzling this saffron milk over the rice layers makes a big difference.
Ghee (clarified butter) brings a rich, nutty flavor. I use it to fry onions and drizzle between the rice layers. Rose water sometimes sneaks in for an extra aromatic boost, but it’s optional depending on your mood.
Fresh mint and cilantro add a burst of brightness that cuts through the spices. I chop them up and layer them in with the rice. Those fried onions I mentioned earlier? They go on top for a sweet, crunchy finish that’s just classic Burmese biryani.

Step-by-Step Burmese Biryani Preparation
Marinade

Step 1: Mix and coat the chicken: Combine all the ingredients for the chicken marinade in a large bowl. Add the chicken pieces and toss thoroughly so every piece is well coated with the marinade.

Step 2: Marinate the chicken: Cover the bowl and let the chicken sit in the marinade for at least 3 hours. For the best flavor, refrigerate and marinate overnight.
Onions

Caramelise the onions: Heat the oil and ghee together in a deep pot over medium heat. Add the sliced onions and fry, stirring regularly, until they are well browned and caramelised. Remove the onions with a slotted spoon, drain on paper towels, and set aside. Leave any remaining fat in the pot and keep the pot for later use without washing.
Rice

Step 1: Cook the rice in stock: Place the rice and cloves into a rice cooker or saucepan. Add the stock and top up with as much water as needed to cook the rice. Cook until the rice is tender and the liquid is absorbed. Fluff the rice gently and set aside.
Curry

Step 1: Temper the whole spices: In the same pot used to fry the onions, add a little more oil if needed and heat over medium heat. Add the whole spices, mustard seeds, cinnamon stick, cardamom pods, and peppercorns. Sauté for about 2 minutes until the spices are fragrant.

Step 2: Add chilli powder and onions: Stir in the chilli powder, then immediately add the previously fried onions back to the pot. Cook on low heat so the chilli powder does not burn, until the onions are soft and heated through.

Step 3: Add garlic and ginger: Add the garlic and ginger to the pot. Fry for 1–2 minutes, stirring, until the ginger is cooked and aromatic.

Step 4: Cook the marinated chicken: Add the marinated chicken to the pot and mix well so it is coated in the onion and spice mixture. Cook over medium heat until the sauce comes up to a boil.

Step 5: Simmer the curry: Add the water and salt. Stir, then cover the pot with a lid and simmer gently for about 40 minutes, or until the chicken is falling off the bone. By this time the curry should have thickened slightly and the oils will have risen to the surface. Taste and adjust salt and spice as needed.

Step 6: Set the curry aside: Once the chicken is cooked and the seasoning adjusted, set the curry aside. It will be served separately alongside the biryani.
Assemble

Step 1: Make the first layer: In an oven-safe pot or dish, spread 1/3 of the cooked rice in an even layer. Top with 1/2 of the cooked chicken pieces only, leaving the curry sauce in the separate pot. Sprinkle 1/3 of the fried onions over the chicken and dot the surface with a few small dabs of butter.

Step 2: Make the second layer: Add another 1/3 of the rice over the first layer. Top with the remaining chicken pieces only and another 1/3 of the fried onions. Add a few more small dabs of butter over the top.

Step 3: Finish the top layer: Add the final 1/3 of the rice as the top layer, then scatter the remaining fried onions over it. Add a few more dabs of butter. Drizzle the saffron milk evenly over the surface.

Step 4: Cover and hold if needed: Seal the dish with a tight-fitting lid or a layer of foil. At this stage, the assembled biryani can be stored in the refrigerator until needed.
Serving Preparation
Step 1: Preheat the oven: Heat the oven to 375°F.

Step 2: Heat the biryani: If the biryani was refrigerated, bring the dish to room temperature first. Place the covered dish in the oven and heat for about 30 minutes, or until the rice in the centre is hot all the way through.

Step 3: Reheat the curry: While the biryani is heating, warm the reserved curry gently on the stove.

Step 4: Serve: Serve the biryani hot, with the curry on the side so each person can drizzle on as much sauce as they prefer.
Marinating the Chicken
I start by cutting 2 pounds of chicken into medium pieces. In a big bowl, I mix the chicken with 1 cup of plain yogurt, 2 tablespoons of ginger paste, and 2 tablespoons of garlic paste. It’s messy, but you want every piece coated.
Then I add the spices: 1 teaspoon turmeric, 2 teaspoons cumin, 2 teaspoons coriander, 1 teaspoon chilli powder, and 1 tablespoon garam masala. I make sure everything gets combined so the chicken is well covered. There’s no shortcut here—just get in there and mix.
The chicken needs to marinate for at least 2 hours in the fridge. If I have time, I let it sit overnight to soak up all the flavors. The yogurt does wonders for tenderness in Burmese biryani, and the spices build those signature flavor layers.
Cooking the Rice
I rinse 3 cups of basmati rice under cold water until it runs clear. This step gets rid of excess starch and keeps the rice from sticking together. It’s a bit tedious, but you’ll thank yourself later.
I bring a big pot of water to a boil, toss in 2 tablespoons of salt, 4 cardamom pods, 1 cinnamon stick, and 4 cloves. Then I drop in the rinsed rice and cook it until it’s about 70% done—usually around 6 or 7 minutes. The grains should still have a little bite in the middle.
I drain the rice right away and spread it out on a tray to cool. This stops the cooking, so it doesn’t go mushy during the final step. With Burmese biryani, you want those grains to stay distinct.
Preparing the Biryani Masala
I heat 1/2 cup of ghee in a heavy pan over medium. I add 1 teaspoon mustard seeds and let them pop for about 30 seconds. The smell at this point is incredible.
I slice up 4 big onions and fry them in the ghee until they’re golden and crispy. These fried onions are what make Burmese biryani so good. I set half aside for later and keep the rest in the pan.
To the onions in the pan, I add 4 chopped green chilies, the marinated chicken with all its yogurt, and a bit of salt. I cook this mix on medium-high for about 15-20 minutes until the chicken’s cooked and the masala thickens. When the oil separates from the masala, you know it’s ready.
Layering and Final Cooking
I soak a pinch of saffron in 1/4 cup warm milk to make saffron milk. I chop 1/2 cup of fresh mint leaves and get my reserved fried onions ready. These will all go into the layers of the Burmese biryani.
I spread half the partially cooked rice in a heavy pot as the first layer. Then I add all the chicken masala, spreading it out evenly. I sprinkle half the mint and half the fried onions over the chicken.
I pile on the rest of the rice. Then I drizzle the saffron milk and 2 tablespoons of rose water over the top, dot with 3 tablespoons of ghee, and scatter the remaining fried onions and mint. It’s not fancy, but it smells amazing already.
I cover the pot tightly and cook on high for 3 minutes. Then I drop the heat to the lowest setting and let it go for 25-30 minutes. I don’t peek—keeping the steam in is key for that classic Burmese biryani texture.

Serving Suggestions and Traditional Sides
Burmese biryani, or danbauk, really shines when you pair it with traditional sides that balance its rich, aromatic flavors. Since Burmese biryani is milder in spice than Indian biryanis, you want sides that add freshness and a bit of zing. The right accompaniments can make all the difference.
Classic Accompaniments
I like to serve my Burmese biryani with a few classic sides. Pickled mango, cucumber salad, and boiled egg are go-tos that you’ll see on many Burmese tables. They’re simple but really round out the meal.
The pickled mango brings a tangy, sweet-sour kick that cuts through the richness. A quick cucumber salad tossed with vinegar and salt adds crunch and freshness. Hard-boiled eggs, sliced or halved, give you a bit more protein and mellow flavor with the spicy rice.
Traditional Burmese Sides:
- Pickled mango
- Cucumber salad
- Hard-boiled eggs
- Fried shallots or onions
These sides follow the Southeast Asian way of balancing flavors. Together, they make Burmese biryani a complete meal that’s satisfying without being too heavy. It’s a combo I never get tired of.
Garnishing and Presentation
I always go big on garnishes for Burmese biryani. Fried onions are a must—I pile them high on the rice just before serving. Their caramelized crunch brings sweet contrast to the tender chicken.
Fresh mint leaves scattered on top add a cool note and a pop of color. Sometimes I’ll add a few drops of rose water for a gentle floral finish. Chopped cilantro is good too, but honestly, mint feels more traditional for Burmese biryani.
For special occasions, I arrange the Burmese biryani on a big platter and top it with sliced boiled eggs, fried onions, and fresh herbs. It looks impressive and stays true to the biryani style. If you haven’t tried this yet, you’re missing out.
Pairing with Raita and Salads
I love pairing my Burmese biryan with cooling raita to mellow out those bold spices. Cucumber raita is my go-to—just grated cucumber, yogurt, salt, and a bit of cumin. That creamy, chilled bite really makes Burmese biryan shine.
Kachumber salad is another option I always suggest. It’s just diced cucumber, tomato, and onion tossed with lemon juice and salt. Burmese biryani feels lighter with this crisp, tangy salad on the side.
Raita Variations:
- Plain yogurt raita
- Cucumber raita
- Mint raita
- Pineapple raita
These sides cool things down and make Burmese biryani a lot easier on the stomach. Honestly, I can’t imagine eating Burmese biryan without at least one yogurt-based dip. Sometimes I even double up on raita if I’m feeling fancy.

Expert Tips, Variations, and Storage Guidelines
Getting Burmese biryan right means paying attention to a few key details. You’ll want to know which techniques matter, how to swap ingredients, and the best ways to keep leftovers tasting fresh. Burmese biryan rewards a little extra effort.
Chef’s Cooking Tips
I always marinate the chicken for at least two hours before making biryani. This way, the meat really soaks up those spices and turns out juicy and packed with flavor. Rushing this step? You’ll taste the difference.
The rice-to-water ratio is everything when cooking biryani. I go with 1.5 cups of water for every cup of basmati rice. If you add too much, Burmese biryan turns mushy; too little, and you’re left with crunchy grains—nobody wants that.
I toast whole spices like cardamom, cinnamon, and cloves in ghee before tossing them in. Burmese biryani gets this incredible aroma when you do that. Trust me, it’s worth the extra minute or two.
Layering matters a lot for authentic Burmese biryan. I put down half the rice, then the chicken, then finish with the rest of the rice. Mixing them up during cooking? Nope, that’s not how I roll.
For dum cooking, I seal the pot tight with foil or dough. I crank the heat for three minutes, then drop it to low for 25 minutes. That’s how Burmese biryan gets perfectly cooked rice—don’t skip this part.
Regional Variations and Ingredient Substitutions
Meat Options:
- Mutton: Super popular in Mandalay’s Burmese biryan versions
- Beef: You’ll find this in some Muslim communities
- Prawns: Coastal Burmese biryan sometimes goes this route
Potato is a classic touch in biryani , at least in my kitchen. I chop them into big chunks and layer them in with the chicken. It’s simple, but Burmese biryan just feels more hearty that way.
For vegetarian Burmese biryan, I swap in paneer or a mix of veggies like carrots, beans, and cauliflower. It cooks faster—maybe 10 minutes less than the meat version. biryani still delivers big flavor, even without chicken.
Spice Substitutions:
| Original Ingredient | Substitute |
|---|---|
| Saffron | Turmeric with a pinch of paprika |
| Ghee | Vegetable oil or butter |
| Fresh curry leaves | Bay leaves |
| Green cardamom | Ground cardamom (use half the amount) |
Sometimes I toss in dried fruits like raisins and cashews between the rice layers. Burmese biryani gets a little festive sweetness that way, which I kind of love. It’s a small thing, but Burmese biryan is all about those personal touches.
Storage and Reheating Recommendations
I stash leftover Burmese biryan in airtight containers in the fridge for up to three days. If I can, I’ll keep the rice and chicken separate—biryani just holds up better that way. Honestly, it’s a small effort for a big payoff in texture.
For freezing, I scoop Burmese biryan into meal-sized containers. It keeps well for about two months, but I never freeze it with potatoes—biryani doesn’t forgive grainy spuds. If you’re picky about texture, trust me on this one.
Reheating Methods:
Microwave: I’ll sprinkle a couple of tablespoons of water over the Burmese biryan and toss a damp paper towel on top. Then I heat it for 2-3 minutes on medium power. Sometimes I check halfway through and give it a quick stir.
Stovetop: I pour in a splash of water or chicken stock in a pan and add the Burmese biryan. I keep the heat low and stir gently every few minutes. Burmese biryani can get a little sticky, so patience helps.
Oven: I preheat to 350°F, toss the biryani in an oven-safe dish with a bit of water, cover it with foil, and heat for about 15-20 minutes. I check it once or twice to make sure it’s not drying out. Burmese biryan reheats surprisingly well this way.
I always thaw frozen biryani in the fridge overnight before reheating. It helps the rice stay fluffy and keeps that perfect Burmese biryan texture. Rushing it just doesn’t do the dish justice.

Burmese Biryani vs Indian Biryani
Burmese biryani and Indian biryani share a common origin but have evolved into distinctly different dishes in terms of flavor, spice level, and cooking technique.
Burmese biryani, often referred to as danbauk, is typically lighter and more aromatic rather than intensely spiced. The rice is fragrant, often cooked with mild spices, and paired with tender chicken or meat. It’s commonly served with sides like fresh salad, pickled vegetables, or a light soup, which balance the dish and keep it from feeling too heavy.
Indian biryani, by contrast, is known for its bold, complex flavor profile. It uses a rich blend of spices such as cumin, cardamom, cloves, and saffron, often combined through layered cooking techniques where partially cooked rice and marinated meat are finished together. This creates deep, concentrated flavors and a more indulgent texture.
The key difference is intensity and richness: Burmese biryani is lighter and more balanced, while Indian biryani is bold, layered, and spice-forward.
If you prefer a milder, more aromatic rice dish with subtle flavors, Burmese biryani is a great choice. If you want a rich, deeply spiced dish with complex layers, Indian biryani is the better option.

Burmese Biryani Recipe FAQ
1. How is Burmese biryani different from Indian biryani?
It is lighter in spices and often served with a side curry.
2. What meat is commonly used?
Chicken is most common.
3. What type of rice is used?
Long-grain rice like basmati.
4. Is the rice layered like traditional biryani?
Yes, but with simpler seasoning.
5. What is served alongside Burmese biryani?
A mild curry or salad.

Burmese Biryani Recipe
Ingredients
- 1 1/4 cups yoghurt
- 6 cloves garlic minced
- 1/2 tsp ginger paste
- 1/4 tsp salt to taste
- 1/2 tsp pepper
- 2 tsp turmeric
- 2 tsp cumin seeds ground
- 1 tablespoon chilli powder or to taste
- 3 lb chicken chicken drumsticks, bone-in thighs, or breasts, or a combination
- 2 tbsp butter
- 2 tbsp peanut oil
- 3 onions large-finely sliced
- For the Chicken Curry
- 3 tbsp peanut oil
- 1/2 tsp mustard seeds
- 1 1- inch cinnamon stick
- 4 green cardamom pods
- 10 black peppercorns
- 1 tsp chilli powder
- 1 onion finely diced
- 3 garlic cloves minced
- 1/2 tsp ginger paste
- salt to taste
- 1 cup water
- 2 cups rice basmati
- 4 cloves
- 2 cups chicken stock
Instructions
- Mix and coat the chicken: Combine all the ingredients for the chicken marinade in a large bowl. Add the chicken pieces and toss thoroughly so every piece is well coated with the marinade.

- Marinate the chicken: Cover the bowl and let the chicken sit in the marinade for at least 3 hours. For the best flavor, refrigerate and marinate overnight.

- Caramelise the onions: Heat the oil and ghee together in a deep pot over medium heat. Add the sliced onions and fry, stirring regularly, until they are well browned and caramelised. Remove the onions with a slotted spoon, drain on paper towels, and set aside. Leave any remaining fat in the pot and keep the pot for later use without washing.

- Cook the rice in stock: Place the rice and cloves into a rice cooker or saucepan. Add the stock and top up with as much water as needed to cook the rice. Cook until the rice is tender and the liquid is absorbed. Fluff the rice gently and set aside.

- Temper the whole spices: In the same pot used to fry the onions, add a little more oil if needed and heat over medium heat. Add the whole spices, mustard seeds, cinnamon stick, cardamom pods, and peppercorns. Sauté for about 2 minutes until the spices are fragrant.

- Add chilli powder and onions: Stir in the chilli powder, then immediately add the previously fried onions back to the pot. Cook on low heat so the chilli powder does not burn, until the onions are soft and heated through.

- Add garlic and ginger: Add the garlic and ginger to the pot. Fry for 1–2 minutes, stirring, until the ginger is cooked and aromatic.
- Cook the marinated chicken: Add the marinated chicken to the pot and mix well so it is coated in the onion and spice mixture. Cook over medium heat until the sauce comes up to a boil.

- Simmer the curry: Add the water and salt. Stir, then cover the pot with a lid and simmer gently for about 40 minutes, or until the chicken is falling off the bone. By this time the curry should have thickened slightly and the oils will have risen to the surface. Taste and adjust salt and spice as needed. Set the curry aside: Once the chicken is cooked and the seasoning adjusted, set the curry aside. It will be served separately alongside the biryani.

- Make the first layer: In an oven-safe pot or dish, spread 1/3 of the cooked rice in an even layer. Top with 1/2 of the cooked chicken pieces only, leaving the curry sauce in the separate pot. Sprinkle 1/3 of the fried onions over the chicken and dot the surface with a few small dabs of butter.

- Make the second layer: Add another 1/3 of the rice over the first layer. Top with the remaining chicken pieces only and another 1/3 of the fried onions. Add a few more small dabs of butter over the top.

- Finish the top layer: Add the final 1/3 of the rice as the top layer, then scatter the remaining fried onions over it. Add a few more dabs of butter. Drizzle the saffron milk evenly over the surface.

- Cover and hold if needed: Seal the dish with a tight-fitting lid or a layer of foil. At this stage, the assembled biryani can be stored in the refrigerator until needed.

- Preheat the oven: Heat the oven to 375°F.

- Heat the biryani: If the biryani was refrigerated, bring the dish to room temperature first. Place the covered dish in the oven and heat for about 30 minutes, or until the rice in the centre is hot all the way through.

- Reheat the curry: While the biryani is heating, warm the reserved curry gently on the stove.

- Serve: Serve the biryani hot, with the curry on the side so each person can drizzle on as much sauce as they prefer.

Video

14 comments
Does anyone else think that Jasmine rice might bring an interesting twist to the traditional Burmese Biryani recipe?
The recipe nailed it with the spices, however, wouldnt adding coconut milk make the biryani more authentic to Burmese cuisine?
Coconut milk, really? I think it would overpower the delicate spice blend. Biryani doesnt need it.
Im curious, does the authenticity of Burmese Biryani hinge on using specific regional rice or can any long-grain work?
Any long-grain rice can work, but its the Burmese spices that make it authentic!
Arent we overlooking the role of correct rice to water ratio in achieving authentic Burmese Biryani texture? Just curious.
Agreed! Rice to water ratio is the unsung hero in making authentic Burmese Biryani.
Why not substitute beef for mutton? Seems like it’d add a unique twist to the traditional Burmese Biryani. Thoughts?
Mutton gives the Biryani its authentic Burmese soul. Beef would be a culinary crime here!
Does the choice of rice really impact the Biryanis authenticity? Could we use Basmati instead of Jasmine rice? Whats everyones take on this?
Basmati is the soul of Biryani! Jasmine rice? Thats culinary blasphemy!
Does anyone else think that the choice of rice is critical for the authentic Burmese biryani experience?
Absolutely! The right rice can make or break a Burmese biryani! Its all about the texture and aroma.
Is there a case to be made for substituting chicken with tofu for a veggie twist? Could still pack a flavor punch!
Comments are closed.